
In today’s world of web development, user authentication is a critical aspect of creating secure and user-friendly applications. Integrating third-party authentication providers, such as GitHub, can simplify the login process for users and enhance the security of your Django website. In this tutorial, we will guide you through the process of adding GitHub login to your Django project with a practical example.
Prerequisites:
- Basic knowledge of Django.
- A Django project up and running.
Let’s get started!
Step 1: Create a Django Project
If you haven’t already, create a Django project using the following command:
django-admin startproject myprojectRecommeded: Please read our blog, on how we create Basic Django Project
Step 2: Set Up Your Django Application
Create a Django app within your project:
cd myproject
python manage.py startapp myapp
Add your app to the INSTALLED_APPS list in myproject/settings.py:
INSTALLED_APPS = [
    # ...
    'myapp',
    # ...
]
Step 3: Configure GitHub Developer Account
To enable GitHub login, you need to create a GitHub Developer account and set up OAuth 2.0 credentials.
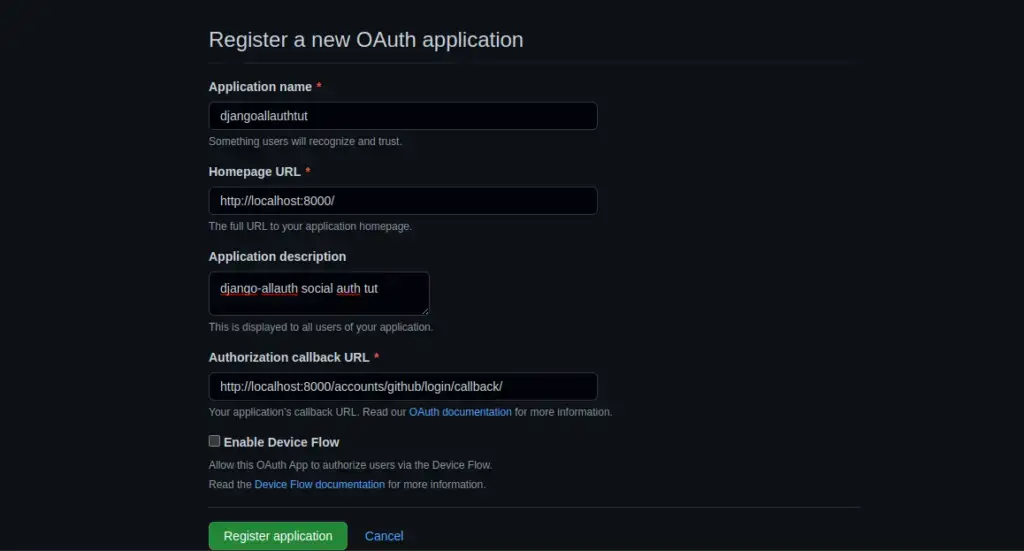
- Go to the GitHub Developer Settings page.
- Create a new OAuth App or select an existing one.
- Note down your “Client ID” and “Client Secret.” We’ll use these later.
- Under “Authorization callback URL,” add the URL where GitHub should redirect users after authentication. Typically, it will be
http://127.0.0.1:8000/accounts/google/login/callback/http://localhost:8000/accounts/google/login/callback/for local development.
Step 4: Install Required Libraries
You’ll need to install some Python libraries to handle OAuth2 authentication and Github integration. Run the following commands:
pip install django-allauthStep 5: Configure Django Allauth
Add 'allauth' and 'allauth.account' to the INSTALLED_APPS and MIDDLEWARE list in your settings.py file:
INSTALLED_APPS = [
    # ...
    'myapp', # Your App
    'allauth',
    'allauth.account',
    'allauth.socialaccount',
    'allauth.socialaccount.providers.github',
    # ...
]

MIDDLEWARE = [
    'django.middleware.security.SecurityMiddleware',
    'django.contrib.sessions.middleware.SessionMiddleware',
    'django.middleware.common.CommonMiddleware',
    'django.middleware.csrf.CsrfViewMiddleware',
    'django.contrib.auth.middleware.AuthenticationMiddleware',
    'django.contrib.messages.middleware.MessageMiddleware',
    'django.middleware.clickjacking.XFrameOptionsMiddleware',
    'allauth.account.middleware.AccountMiddleware',
]

AUTHENTICATION_BACKENDS = [
    'django.contrib.auth.backends.ModelBackend',  # Default ModelBackend
    'allauth.account.auth_backends.AuthenticationBackend',  # Allauth authentication backend for social authentication
]

LOGIN_REDIRECT_URL = '/'
ACCOUNT_EMAIL_VERIFICATION = 'none'

SOCIALACCOUNT_PROVIDERS = {
    'github': {
        'METHOD': 'oauth2',
        'SCOPE': ['user:email'],
        'APP': {
            'client_id': 'YOUR_CLIENT_ID',
            'secret': 'YOUR_CLIENT_SECRET',
        }
    }
}
Replace 'YOUR_CLIENT_ID' and 'YOUR_CLIENT_SECRET' with the values you obtained from the Google Developers Console.
Step 6: Create a Custom User Model (Optional)
The default Django User model includes fields like username, email, and password, which cover the basics of user authentication and management. However, real-world applications often demand more user-specific attributes and functionalities. Imagine a scenario where you’re building a social platform or an e-commerce site. You might need to store user profiles, social media links, user avatars, or even track user activity.
Learn more about How to Extend the Django User Model: Exploring Various Approaches
Step 9: Update URLs
In your myproject/urls.py file, add the following URL patterns:
from django.urls import path, include

urlpatterns = [
    # ...
    path('accounts/', include('allauth.urls')),
    path('auth/', include('allauth.socialaccount.urls')),
    # ...
]
Step 9: Create Templates (Optional)
Create templates for login and account management in the myapp/templates/ directory, following Allauth’s templates structure.
Step 10: Migrate and Run the Server
Run the following commands to apply migrations and start the development server:
python manage.py makemigrations
python manage.py migrate
python manage.py runserver
Visit http://localhost:8000/accounts/login/ to see your Facebook login in action.
You can also check the users account list in Django Admin. Create a superuser – python manage.py createsuper and go to http://localhost:8000/admin/
Congratulations! You’ve successfully added GitHub login to your Django website. Users can now sign in with their GitHub accounts, simplifying the registration process and enhancing their user experience.
Ensure responsible handling of user data and permissions when integrating third-party authentication to maintain the privacy and security of your users’ information while providing a seamless login experience.
Read Next: Learn how to protect your CLIENT ID AND SECRET in python project.
Find this tutorial on Github.
Also check our blog for Facebook and Gmail Login
- Add Facebook Login to Django Website using django-allauth
- Add Google Gmail Login to Django Website using django-allauth