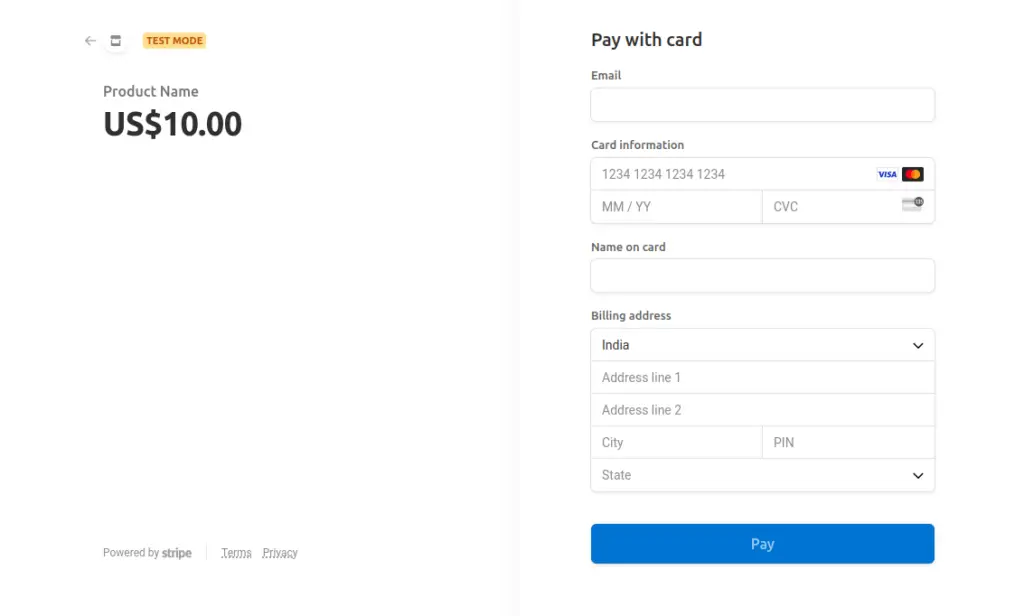
In today’s digital age, if you’re running an e-commerce website or offering any online services, you know the importance of having a seamless and secure payment processing system. Django, a popular Python web framework, combined with Stripe, a leading payment gateway, can provide you with a powerful and flexible solution to handle payments on your website. In this blog, we’ll walk you through the steps to integrate Stripe payment gateway with your Django application.

Why Choose Stripe?
Stripe is a widely trusted and developer-friendly payment gateway that offers numerous benefits, including:
- Security: Stripe is renowned for its strong security features, including PCI compliance, two-factor authentication, and fraud protection, ensuring the safety of your customers’ sensitive data.
- User Experience: Stripe provides a seamless payment experience with its customizable checkout forms, reducing friction in the payment process.
- Developer-Friendly: Stripe offers extensive documentation, client libraries for various programming languages (including Python), and an intuitive API, making it easy for developers to integrate and customize.
- International Support: Stripe supports payments in more than 135 currencies and is available in over 40 countries, making it an excellent choice for businesses with a global reach.
- Subscription Billing: If you offer subscription-based services, Stripe simplifies the management of recurring payments with its Subscription API.
Step by Step Implementation
Now, let’s dive into the steps to integrate Stripe with your Django application.
Step 1: Sign Up for a Stripe Account
If you don’t already have a Stripe account, you’ll need to sign up at Stripe’s official website. Once registered, you can access your Dashboard, where you’ll find your API keys and other essential information.
Step 2: Install Required Packages
In your Django project, you’ll need to install the stripe Python package to interact with the Stripe API. You can install it using pip:
pip install stripeStep 3: Configuration
Next, you’ll need to configure your Django settings to store your Stripe API keys securely. It’s a good practice to use environment variables to store sensitive information. You can add your Stripe API keys to your project’s settings like this:
# settings.py

STRIPE_PUBLIC_KEY = 'your_stripe_public_key'
STRIPE_SECRET_KEY = 'your_stripe_secret_key'
Here is the sample public and secret key provided by stripe, which you can use for demo testing
STRIPE_PUBLIC_KEY = 'pk_test_51BTUDGJAJfZb9HEBwDg86TN1KNprHjkfipXmEDMb0gSCassK5T3ZfxsAbcgKVmAIXF7oZ6ItlZZbXO6idTHE67IM007EwQ4uN3'
STRIPE_SECRET_KEY = 'sk_test_tR3PYbcVNZZ796tH88S4VQ2u'
Step 4: Create Views and Templates
In your Django application, create views for handling payments, including creating a checkout view, success view, and failure view. Additionally, design templates for your payment forms and success/failure pages.
This example covers creating a checkout view, success view, and failure view.
views.py
import stripe
from django.conf import settings
from django.shortcuts import render, redirect

stripe.api_key = settings.STRIPE_SECRET_KEY

def create_checkout_session(request):
    # Create a new Checkout Session
    session = stripe.checkout.Session.create(
        payment_method_types=['card'],
        line_items=[
            {
                'price_data': {
                    'currency': 'usd',
                    'product_data': {
                        'name': 'Product Name',
                    },
                    'unit_amount': 1000,  # Amount in cents
                },
                'quantity': 1,
            },
        ],
        mode='payment',
        success_url=request.build_absolute_uri(reverse('success')),
        cancel_url=request.build_absolute_uri(reverse('cancel')),
    )

    return redirect(session.url)

def success(request):
    return render(request, 'success.html')

def cancel(request):
    return render(request, 'cancel.html')
Now, let’s create the templates for the success and cancel pages:
templates/success.html
<!DOCTYPE html>
<html lang="en">
<head>
    <meta charset="UTF-8">
    <meta name="viewport" content="width=device-width, initial-scale=1.0">
    <title>Payment Success</title>
</head>
<body>
    <h1>Payment Successful</h1>
    <p>Thank you for your purchase!</p>
</body>
</html>
templates/cancel.html
<!DOCTYPE html>
<html lang="en">
<head>
    <meta charset="UTF-8">
    <meta name="viewport" content="width=device-width, initial-scale=1.0">
    <title>Payment Cancelled</title>
</head>
<body>
    <h1>Payment Cancelled</h1>
    <p>Your payment was not completed.</p>
</body>
</html>
Step 5: Create a Stripe Checkout Session
To initiate a payment, create a Stripe Checkout Session in your Django view. You’ll use the stripe Python library to achieve this. Here’s a simplified example:
# views.py

import stripe
from django.conf import settings
from django.shortcuts import render, redirect
from django.urls import reverse

stripe.api_key = settings.STRIPE_SECRET_KEY

def create_checkout_session(request):
    # Create a new Checkout Session
    session = stripe.checkout.Session.create(
        payment_method_types=['card'],
        line_items=[
            {
                'price_data': {
                    'currency': 'usd',
                    'product_data': {
                        'name': 'Your Product Name',
                    },
                    'unit_amount': 1000,  # Amount in cents
                },
                'quantity': 1,
            },
        ],
        mode='payment',
        success_url=request.build_absolute_uri(reverse('success')),
        cancel_url=request.build_absolute_uri(reverse('cancel')),
    )

    return redirect(session.url)

def success(request):
    return render(request, 'success.html')

def cancel(request):
    return render(request, 'cancel.html')
templates/checkout.html
<!DOCTYPE html>
<html lang="en">
<head>
    <meta charset="UTF-8">
    <meta name="viewport" content="width=device-width, initial-scale=1.0">
    <title>Checkout</title>
</head>
<body>
    <h1>Checkout Page</h1>

    <form action="{% url 'create_checkout_session' %}" method="POST">
        {% csrf_token %}
        <button type="submit">Pay Now</button>
    </form>
</body>
</html>
Lastly, don’t forget to add URL patterns for your views in your project’s urls.py:
from django.urls import path
from . import views

urlpatterns = [
    path('checkout/', views.create_checkout_session, name='create_checkout_session'),
    path('success/', views.success, name='success'),
    path('cancel/', views.cancel, name='cancel'),
]
With these views, templates, and URL patterns in place, you can create a “Pay Now” button on your checkout.html page that, when clicked, will initiate the Stripe checkout process. After successful payment or cancellation, users will be redirected to the respective success or cancel pages.
Step 6: Handle Webhooks (Optional)
To handle events like successful payments or subscription updates, you can set up webhooks in your Stripe Dashboard and create corresponding views in your Django application to handle these events.
Step 7: Test Your Integration
Before going live, make sure to thoroughly test your Stripe integration in test mode. Stripe provides test card numbers and other test data for this purpose. Go to http://localhost:8000/checkout, if you cancel payment http://localhost:8000/cancel and on successfuel payment http://localhost:8000/success
Step 8: Go Live
Once you’ve tested your integration and are satisfied with the results, you can switch your Stripe account to live mode, update your API keys in your Django settings, and start accepting real payments.
Conclusion
Integreeting Stripe payment gateway with Django can significantly enhance the functionality of your website or online service. Stripe’s robust security, developer-friendly tools, and global reach make it a top choice for handling online payments. By following the steps outlined in this guide, you can streamline your payment processing and provide a seamless experience for your customers. So, start accepting payments with Stripe and Django today and watch your online business thrive!
Find this project on Github.
Read our blog on How to Protect Sensitive Data in Python Projects like Django and Flask
As you are using sensitive data in your project, like api keys and secrets. You need protect it.
