
Django, a high-level Python web framework, has gained immense popularity among web developers for its simplicity, scalability, and robustness. If you’re a Windows user and want to start building web applications using Django, you’re in the right place. In this step-by-step guide, we’ll walk you through the process of installing Django on your Windows machine.
Prerequisites
Before we dive into the installation process, make sure you have the following prerequisites in place:
- Python: Django is a Python framework, so you’ll need Python installed. Visit the official Python website and download the latest version (Python 3.7 or higher is recommended).
- Pip (Python Package Installer): Pip is included with Python 3.4 and later versions.
Install Python and Pip
Download the Python Web Installer from Stable Release – here
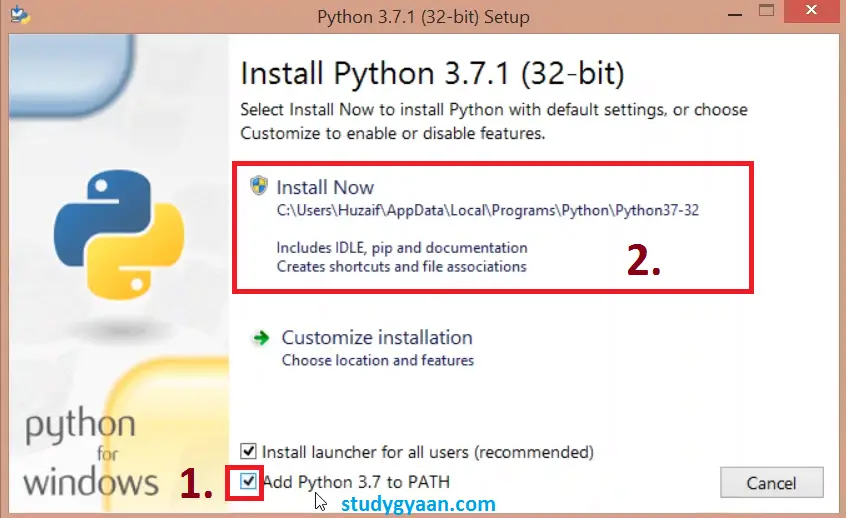
Open the setup file of Python which we have downloaded. Double click on that file and follow the steps in Images.:
- Check the box for Add Python 3.7 to PATH for accessing python from the command line.
- Customize installation: Remove features that can be used by Python Frameworks (I recommend let it be the default).
- Click on Install Now for installing and give permissions
Verify if Python and Pip is installed, by typing the below commands –
python --version
pip --version
If Pip is not installed, you can follow the official installation guide to install it.
Step 1: Open a Command Prompt
To install Django, you’ll need to use the command prompt. Press Win + R, type cmd, and hit Enter to open a command prompt window.
Step 2: Create a Virtual Environment (Optional but Recommended)
Creating a virtual environment is a good practice to isolate your project’s dependencies. To create a virtual environment, run the following command:
python -m venv myenvReplace myenv with your preferred virtual environment name.
Step 3: Activate the Virtual Environment
Navigate to the directory where you created the virtual environment (e.g., cd myenv) and activate it:
For Command Prompt:
myenv\Scripts\activateFor PowerShell:
myenv\Scripts\Activate.ps1Step 4: Install Django
With the virtual environment activated, you can now install Django using Pip:
pip install DjangoThis command will download and install the latest version of Django and its dependencies.
Step 5: Verify Django Installation
To verify that Django has been installed successfully, you can check the installed version by running:
python -m django --versionThis should display the installed Django version, such as “3.x.x.”
Step 6: Create a Django Project
Now that Django is installed, you can create a new Django project. Navigate to the directory where you want to create your project and run:
django-admin startproject projectnameReplace projectname with the desired name for your project.
Step 7: Run the Development Server
To start the development server and see your Django project in action, navigate to your project’s directory and run the following command:
cd projectname
python manage.py runserver
This command will start the development server, and you should see output indicating that the server is running. Open a web browser and visit http://127.0.0.1:8000/ to see your Django project’s default page.
Congratulationionss! You’ve successfully installed Django on your Windows machine and created a new Django project. You’re now ready to start building web applications using this powerful Python framework.