
Let’s walk through the steps to create a Sample Spring Boot Project from scratch that you can use as a foundation for multiple Spring Boot tutorials. Let’s start step by step:
Create a Basic Spring Boot Project
Step 1: Set Up Your Development Environment
Before we begin, ensure you have the following installed on your machine:
- Java Development Kit (JDK) 8 or later
- Apache Maven
- An IDE such as IntelliJ IDEA Community Edition
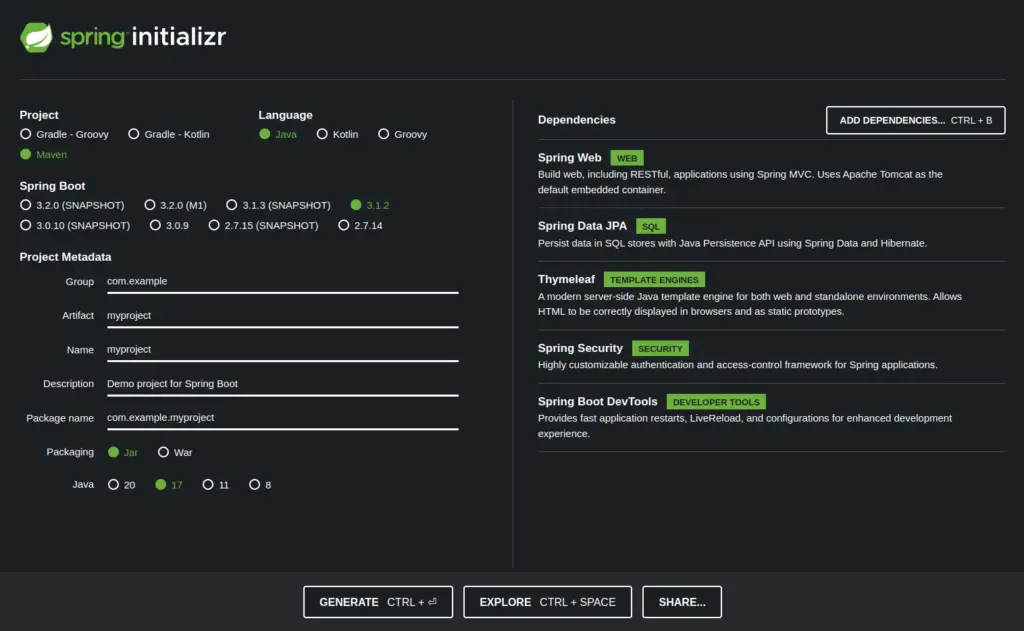
Step 2: Create a New Spring Boot Project
To create a new Spring Boot project, you can use the Spring Initializr. This is a web-based tool that helps you generate a basic Spring Boot project structure with the required dependencies.
Go to the Spring Initializr website. We have create a basic project, you click here to download.
Fill in the project details:
- Project: Choose “Maven” or “Gradle” Project based on your requirements.
- Language: Choose “Java.” Choose accordingly to version which is installed in your system.
- Spring Boot: Choose the latest stable version available at the time.
- Project Metadata: Enter your project’s Group and Artifact names. The group is usually in reverse domain name notation (e.g., com.example), and the artifact is the project’s name (e.g., myproject).
- Dependencies: Select the dependencies you want to include in your project. For starters, you can choose “Web” to include Spring Web, which will be useful for creating RESTful APIs. Add Dependencies as per your Requirements
Click on “Generate” to download the project as a zip file.
Step 3: Import the Project into Your IDE
Unzip the downloaded project and import it into your preferred IDE. For Eclipse and IntelliJ IDEA, you can import it as an existing Maven project.
Step 4: Project Structure Overview
Once you import the project, it will have a standard Spring Boot project structure. The main class that serves as the entry point of your application is usually named Application.java. It will look something like below which will reside in src > main > java > com.example.myproject > MyprojectApplication.
package com.example.myproject;

import org.springframework.boot.SpringApplication;
import org.springframework.boot.autoconfigure.SpringBootApplication;

@SpringBootApplication
public class Application {

    public static void main(String[] args) {
        SpringApplication.run(Application.class, args);
    }

}
Step 5: Create a Basic REST Endpoint
Let’s create a simple RESTful endpoint to get you started. Create a new Java class in a suitable package, for example, com.example.myproject.controller.
package com.example.myproject.controller;

import org.springframework.web.bind.annotation.GetMapping;
import org.springframework.web.bind.annotation.RequestMapping;
import org.springframework.web.bind.annotation.RestController;

@RestController
@RequestMapping("/api")
public class SampleController {

    @GetMapping("/hello")
    public String sayHello() {
        return "Hello, Spring Boot!";
    }
}
Step 6: Build and Run the Project
Now, let’s build and run the project. You can either use your IDE’s built-in tools to do this or run the following command in the project’s root directory:
mvn spring-boot:run
Step 7: Test the Endpoint
Once the application is running, open your web browser or any API testing tool (e.g., Postman) and visit: http://localhost:8080/api/hello
You should see the response: “Hello, Spring Boot!”
Congratulations! You have created a simple Spring Boot project with a basic RESTful endpoint, using the Group as com.example and the Artifact (project name) as myproject. Now you can use this project as a starting point for multiple Spring Boot projects and experiments.
Find this Project on Github