Essential extension for database developers is SQLTools, which enables developers to interact with databases directly within VS Code. In this blog post, we’ll explore how to connect MySQL to Visual Studio Code using SQLTools, allowing developers to execute SQL queries, manage databases, and visualize data without leaving their code editor.
Step 1: Installing SQLTools Extension
Before we dive into connecting MySQL to Visual Studio Code, we need to ensure that SQLTools is installed. You can easily install SQLTools from the Visual Studio Code Marketplace by following these simple steps:
- Open Visual Studio Code.
- Navigate to the Extensions view by clicking on the Extensions icon in the Activity Bar on the side of the VS Code window or by pressing
Ctrl+Shift+X. - Search for “SQLTools” in the Extensions Marketplace.
- Click on the “Install” button next to SQLTools.

Step 1.1: Add SQL Driver Required for SQLTools
Click on SQLTool Extension and ask you to Add New Database Connection. Now this will ask for Install MySQL Driver. Again to extensions and Search SQLTools, bellow SQLTools you will find SQLTools MySQL/MariaDB/TiDB install it.
- Open Visual Studio Code.
- Navigate to the Extensions view by clicking on the Extensions icon in the Activity Bar on the side of the VS Code window or by pressing
Ctrl+Shift+X. - Search for “SQLTools” in the Extensions Marketplace. Bellow it, you will find SQLTools MySQL/MariaDB/TiDB install it
Once SQLTools and SQLTools MySQL/MariaDB/TiDB driver is installed, we can proceed to set up a connection to our MySQL database.
Step 2: Connecting MySQL to Visual Studio Code using SQLTools
Here’s a step-by-step guide to connecting MySQL to Visual Studio Code using SQLTools:
- Open SQLTools: After installing the SQLTools extension, open it by clicking on the SQLTools icon in the Activity Bar.
- Add a New Connection: Click on the “+” button in the SQLTools sidebar to add a new connection.
- Select MySQL: In the Connection Type dropdown, select MySQL.
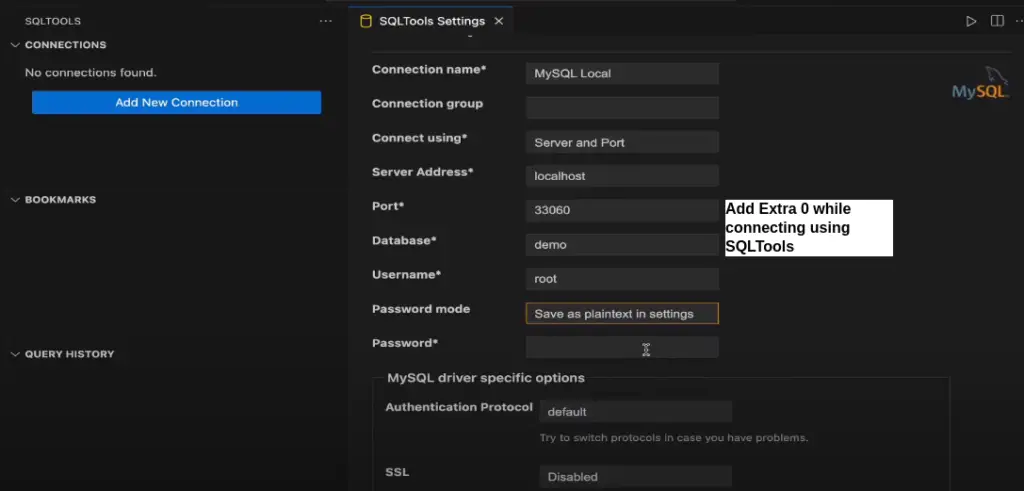
- Enter Connection Details: Fill in the connection details, including the hostname or IP address of your MySQL server, port number (default is 3306), database name, MySQL username, and password. Please check Bellow Image
- Test Connection: Click on the “Test Connection” button to verify that SQLTools can successfully connect to your MySQL server.
- Save Connection: If the test is successful, click on the “Save” button to save your connection settings.
- Connect to MySQL: Once the connection is saved, click on the connection name in the SQLTools sidebar to establish a connection to your MySQL server.
- Run Queries: After successfully connecting, you can now execute SQL queries against your MySQL database directly from Visual Studio Code using SQLTools.

Conclusion
By integrating SQLTools into Visual Studio Code, developers can enhance their productivity by seamlessly interacting with MySQL databases without switching between different tools or environments. Whether you’re debugging SQL queries, managing database schemas, or visualizing data, SQLTools provides a convenient and efficient way to work with MySQL within the familiar interface of VS Code.
In conclusion, connecting MySQL to Visual Studio Code using SQLTools empowers developers to streamline their database development workflow, ultimately leading to faster development cycles and better code quality. If you haven’t already explored SQLTools, I highly recommend giving it a try and unlocking its full potential for database development within VS Code.
Check this blog – MySQL: How to Create a New User and Grant Permissions – Windows/Ubuntu