
Django’s built-in admin panel provides a powerful interface for managing your application’s data, but its default appearance may not always align with your project’s design or functionality requirements. Fortunately, Django allows extensive customization of the admin panel. In this comprehensive blog post, we’ll explore various techniques and examples to help you fully customize the Django admin panel to meet your specific needs.
Table of contents
Prerequisites
Before we get started with admin panel customization, ensure you have the following prerequisites:
- Django Installed: Make sure you have Django installed in your Python environment. You can install it using pip:
pip install Django- Django Project: Set up a Django project with the necessary models and admin configuration.
- Basic Understanding of Django: Familiarity with Django’s project structure, views, templates, and admin panel basics is recommended.
Note: This blog assumes you already have an existing Django project and an admin user with superuser privileges. For example you can look at our blog How to Create and Register Models in Django. In here, we have create a Django Project with name ‘myproject‘ and app named ‘myapp‘. Create a Superuser as admin and password as Password@123
Find this tutorial on Github.
Customization Techniques and Examples
Let’s dive into the techniques for customizing the Django admin panel. Here is my myapp/admin.py look like:
from django.contrib import admin
from .models import Product
from django.urls import path
from django.http import HttpResponse

admin.site.site_header = "YOUR PROJECT NAME"
admin.site.site_title = "My Admin Panel"

@admin.register(Product)
class ProductAdmin(admin.ModelAdmin):
    list_display = ('name', 'price', 'is_published')
    list_filter = ('is_published',)
    search_fields = ('name',)
    fieldsets = (
        (None, {
            'fields': ('name', 'description')
        }),
        ('Pricing', {
            'fields': ('price', 'is_published'),
        }),
    )

    actions = ['mark_as_published', 'mark_as_unpublished']

    def mark_as_published(self, request, queryset):
        queryset.update(is_published=True)
        self.message_user(request, 'Selected products were marked as published.')

    mark_as_published.short_description = 'Mark selected products as published'

    def mark_as_unpublished(self, request, queryset):
        queryset.update(is_published=False)
        self.message_user(request, 'Selected products were marked as unpublished.')

    mark_as_unpublished.short_description = 'Mark selected products as unpublished'

    def custom_view(self, request):
        # Your custom view logic here
        return HttpResponse("This is a custom admin view.")

    def get_urls(self):
        urls = super().get_urls()
        custom_urls = [
            path('custom-view/', self.custom_view, name='custom_view'),
        ]
        return custom_urls + urls
Now lets break it down and understand each cusomization.
1. Customizing the Admin Site Title and Header
You can change the title and header of the admin panel to match your project’s branding:
# admin.py
from django.contrib import admin

admin.site.site_header = "Custom Admin Panel"
admin.site.site_title = "Admin Panel"
2. Customizing Model List Display
Modify how models are displayed in the admin panel’s list view by defining a list_display attribute:
# admin.py
from django.contrib import admin
from .models import Product
@admin.register(Product)
class ProductAdmin(admin.ModelAdmin):
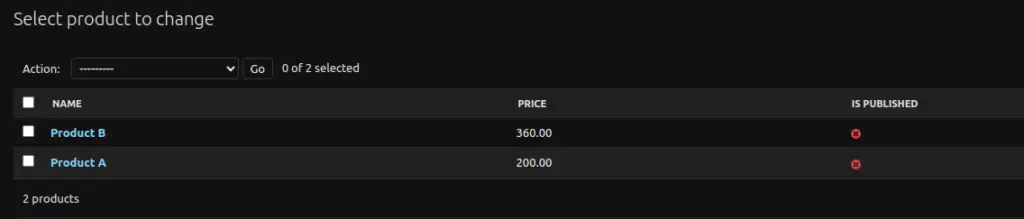
list_display = ('name', 'price', 'is_published')This example customizes the Product model’s list view to display the name, price, and a custom field called is_published.
3. Adding Search and Filter Options
Enable search and filtering for specific fields in the list view:
# admin.py
from django.contrib import admin
from .models import Product

@admin.register(Product)
class ProductAdmin(admin.ModelAdmin):
    list_display = ('name', 'price', 'is_published')
    list_filter = ('is_published',)
    search_fields = ('name',)
Now, you can search for products by name and filter them based on the is_published field.

4. Customizing Form Layout
Change the layout and ordering of fields in the add/edit form for a model using the fields or fieldsets attribute:
# admin.py
from django.contrib import admin
from .models import Product
@admin.register(Product)
class ProductAdmin(admin.ModelAdmin):
list_display = ('name', 'price', 'is_published')
fieldsets = (
(None, {
'fields': ('name', 'description')
}),
('Pricing', {
'fields': ('price', 'is_published'),
}),
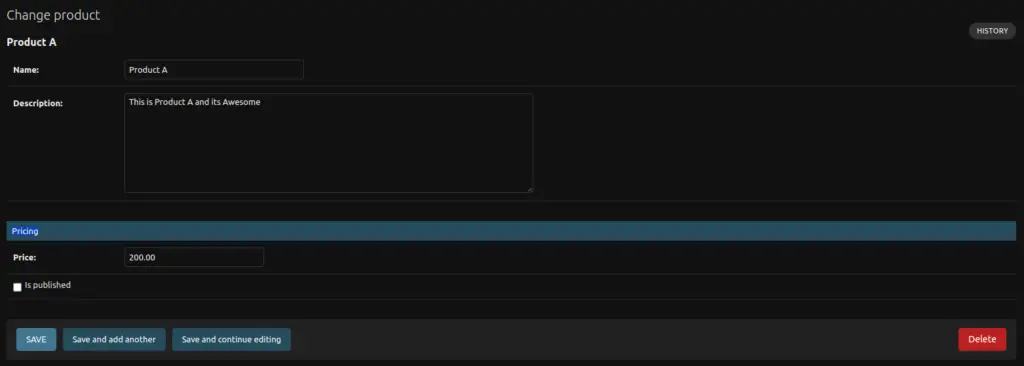
)This example organizes the form for the Product model into two sections: “General” and “Pricing.”
5. Customizing Admin Actions
Define custom admin actions to perform batch actions on selected records in the list view:
# admin.py
from django.contrib import admin
from .models import Product
@admin.register(Product)
class ProductAdmin(admin.ModelAdmin):
list_display = ('name', 'price', 'is_published')
actions = ['mark_as_published', 'mark_as_unpublished']
def mark_as_published(self, request, queryset):
queryset.update(is_published=True)
self.message_user(request, 'Selected products were marked as published.')
mark_as_published.short_description = 'Mark selected products as published'
def mark_as_unpublished(self, request, queryset):
queryset.update(is_published=False)
self.message_user(request, 'Selected products were marked as unpublished.')
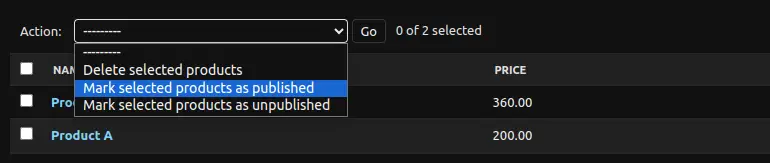
mark_as_unpublished.short_description = 'Mark selected products as unpublished'This example adds a custom admin action to mark selected products as published and unpublished
6. Customizing Admin Templates
You can override the default admin templates to completely redesign the admin panel’s appearance. Create a directory named admin within your app’s templates directory and place custom template files there. Refer to the Django documentation for more details.
7. Customizing Admin Media Files
Customize the admin panel’s media files (CSS and JavaScript) to apply your styles or scripts. Create a custom CSS file and include it in your admin templates as needed.
<!-- In your admin template -->
{% load static %}
<link rel="stylesheet" type="text/css" href="{% static 'admin/custom_admin.css' %}">
8. Adding Custom Views and Pages
Extend the admin panel by adding custom views and pages. For example, you can create a custom admin dashboard or reports page.
# admin.py
from django.contrib import admin
from django.urls import path
from django.http import HttpResponse

@admin.register(Product)
class ProductAdmin(admin.ModelAdmin):
    # ...

    def custom_view(self, request):
        # Your custom view logic here
        return HttpResponse("This is a custom admin view.")

    def get_urls(self):
        urls = super().get_urls()
        custom_urls = [
            path('custom-view/', self.custom_view, name='custom_view'),
        ]
        return custom_urls + urls
This example adds a custom view named custom_view accessible from /admin/app_name/model_name/custom-view/.

9. Theming with Third-Party Libraries
Leverage third-party libraries like django-grappelli or django-jet to apply pre-designed themes and styles to your admin panel.
pip install django-grappelli # or django-jetFollow the installation and configuration instructions for the chosen library to apply a theme to your admin panel.
Conclusion
Customizing the Django admin panel is essential for aligning it with your project’s branding and functionality. By following the techniques and examples outlined in this comprehensive guide, you can fully tailor the admin panel to meet your specific requirements. Whether you need to change titles, customize form layouts, or add custom views and styles, Django provides the flexibility and tools to create a customized admin interface that enhances your project’s management capabilities.