
Authentication is a crucial aspect of any web application, especially when it comes to securing APIs. OAuth2 is a widely adopted authentication protocol that allows users to grant third-party applications limited access to their resources without sharing their credentials. In this blog post, we’ll explore OAuth2 authentication in the context of Django Rest Framework (DRF) and provide examples to help you implement it in your Django applications.
What is OAuth2?
OAuth2, short for “Open Authorization 2.0,” is a protocol that enables secure authorization of third-party applications to access a user’s data or resources on a server without exposing their credentials. It’s commonly used in scenarios where users want to grant limited access to their data to external services, such as social media logins, API access, or delegated authorization.
OAuth2 relies on tokens (access and refresh tokens) to grant access to resources. Access tokens are short-lived and used for API requests, while refresh tokens are used to obtain new access tokens without the need for user interaction.
OAuth2 Roles: Before diving into OAuth2 implementation in Django Rest Framework, let’s briefly discuss the main roles involved in the OAuth2 flow:
- Resource Owner: The user who owns the data and grants access to it.
- Client: The third-party application that wants to access the user’s data.
- Authorization Server: The server responsible for authenticating the user and issuing access tokens.
- Resource Server: The server hosting the user’s protected resources, which the client wants to access.
Now, let’s see how to implement OAuth2 authentication in Django Rest Framework.
Step by Step Implementation
We will create a Django project and configure it step by step to enable OAuth2 authentication.
Step 1. Create a Django Project
Let’s start by creating a new Django project. If you haven’t already installed Django, you can do so using pip:
pip install djangoNow, create a new Django project:
django-admin startproject myproject
cd myproject
Step 2. Install Dependencies
We need to install two important packages: djangorestframework and django-oauth-toolkit. These packages will help us implement OAuth2 authentication and set up our API using Django Rest Framework.
pip install djangorestframework django-oauth-toolkitStep 3. Configure Settings
Open the settings.py file in your project and make the following configurations:
Add Apps to INSTALLED_APPS
INSTALLED_APPS = [
    # ...
    'oauth2_provider',
    'rest_framework',
]

LOGIN_URL='/admin/'
Define OAuth2 Scopes: Define the scopes needed for OAuth2 in your settings.py:
OAUTH2_PROVIDER = {
    'SCOPES': {'read': 'Read scope', 'write': 'Write scope', 'groups': 'Access to your groups'}
}
Configure Authentication and Permissions for Django Rest Framework
Configure the default authentication and permission classes for Django Rest Framework in your settings.py:
REST_FRAMEWORK = {
    'DEFAULT_AUTHENTICATION_CLASSES': (
        'oauth2_provider.contrib.rest_framework.OAuth2Authentication',
    ),

    'DEFAULT_PERMISSION_CLASSES': (
        'rest_framework.permissions.IsAuthenticated',
    ),
}
Step 4. Define URL Patterns
In your project’s urls.py, configure URL patterns for OAuth2 operations:
from django.contrib import admin
from django.urls import path, include

urlpatterns = [
    path('admin/', admin.site.urls),
    path('o/', include('oauth2_provider.urls', namespace='oauth2_provider')),
]
Step 5. Apply Migrations
Migrate your changes to create the necessary database tables:
python manage.py makemigrations
python manage.py migrate
Step 6. Create a Superuser and Run Server
Create a superuser account to access the Django admin panel. Remember your username and password, as we need it later.
python manage.py createsuperuserAfter creating superuser, run your project
python manage.py runserverYou can now access the configured URL patterns, including the Django admin panel.
Step 7. Register an OAuth2 Application
To obtain an OAuth2 token, you must register an application. Open your web browser and Log in using the superuser credentials created earlier.
Now To register an app, you have to go to http://localhost:8000/o/applications/
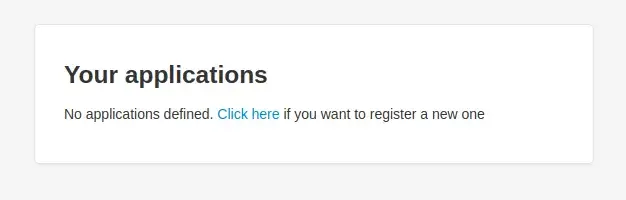
Click on the `click here` link to register a new app. It will take you to a form, fill it like below, replace your client id and secret, if they are values in it.
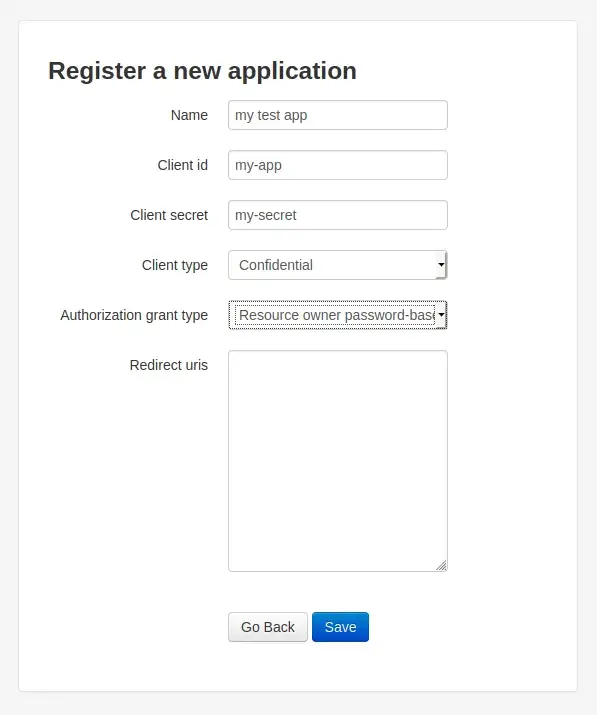
Save it and Now you have created an app for OAuth. And it’s time for generating your OAuth token.
Step 8. Generate OAuth Token using CURL or Postman
To obtain an access token using a tool like curl
curl -X POST "http://localhost:8000/o/token/" -d "grant_type=password&username=<YOUR_USERNAME>&password=<YOUR_PASSWORD>&client_id=<CLIENT_ID>&client_secret=<CLIENT_SECRET>"Example:
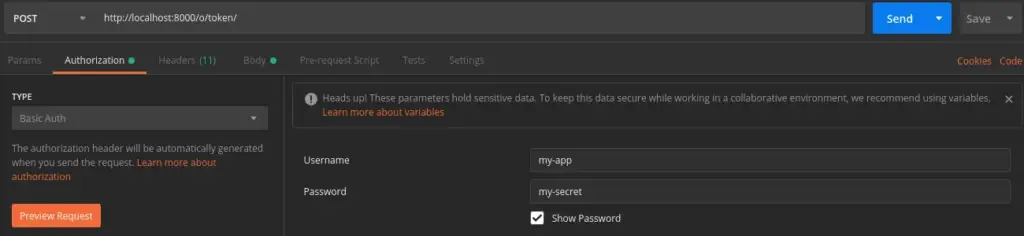
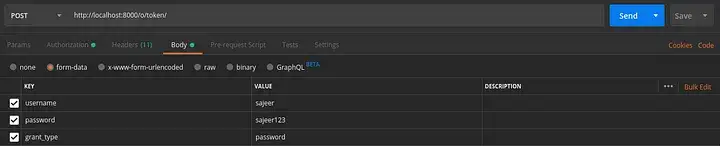
curl -X POST "http://localhost:8000/o/token/" -d "grant_type=password&username=admin&password=Password@123&client_id=my-app&client_secret=my-secret"To obtain an access token using a tool like postman
Basic Authorisation Headers: This username will be the Client id of the app you just registered, and the password will be Client secret just like
Request Body: We will have to pass parameters username, password and grant_type in the request body. Here, I’m using the form-data method to pass the body.
Once you call this API with exact credentials, you will get response with an OAuth access token like below
{
    "access_token": "<your_access_token>",
    "token_type": "Bearer",
    "expires_in": 36000,
    "refresh_token": "<your_refresh_token>",
    "scope": "read write groups"
}
Now Access the protected views using the obtained access token:
curl -H "Authorization: Bearer <ACCESS_TOKEN>" "http://localhost:8000/example/"Step 9: Accessing Protected Resources
Now lets take example of protect views, which you can only access using <ACCESS_TOKEN>.
Create a new Django app or use an existing one for your API. In your app’s views.py, set up views to handle OAuth2 authorization and token requests:
# myapp/views.py

from rest_framework.views import APIView
from rest_framework.response import Response
from rest_framework.permissions import IsAuthenticated

class ProtectedResourceView(APIView):
    permission_classes = [IsAuthenticated]

    def get(self, request):
        return Response({"message": "This is a protected resource!"})

# myapp/urls.py

from django.urls import path
from .views import ProtectedResourceView

urlpatterns = [
    path('api/protected-resource/', ProtectedResourceView.as_view(), name='hello_world'),
]

# myproject/urls.py

from django.contrib import admin
from django.urls import path, include

urlpatterns = [
    path('admin/', admin.site.urls),
    path('o/', include('oauth2_provider.urls', namespace='oauth2_provider')),
    path('', include('myapp.urls')),
]
In this example, we’ve created a view called ProtectedResourceView that requires authentication using the IsAuthenticated permission class.
Now Access the protected views using the obtained access token, which was generated in step 8
curl -H "Authorization: Bearer <ACCESS_TOKEN>" "http://localhost:8000/api/protected-resource/"Conclusion
Implementing OAuth2 authentication in Django Rest Framework enhances the security of your API by allowing controlled access to authorized third-party applications. By following the steps outlined in this tutorial, you’ve learned how to set up OAuth2 authentication, secure your views, and provide a secure mechanism for clients to access protected resources. This framework promotes security best practices and is widely used in various applications to ensure safe and reliable access control.
Find this project on Github.
Blogs You Might Like to Read!
- Simple JWT Authentication with Django REST Framework
- YAML, XML, JSON Response Renderer in Django Rest Framework
- Custom Response Content Negotiation in Django Rest Framework
- Django Rest Framework CRUD Methods in One View: GET, POST, PUT, and DELETE
- Versioning APIs in Django Rest Framework Guide with Examples
- Django Rest Framework Best Practices for Building Powerful APIs
- Best Folder and Directory Structure for a Django Project
- Throttling in Django Rest Framework for Fair API Usage and Limit Requests