
In modern web applications, presenting a large dataset to users without overwhelming them is crucial. Pagination provides a solution by breaking down the data into manageable chunks, enhancing user experience and performance. In this blog, we will explore how to implement pagination in a Spring Boot application using Thymeleaf, a powerful template engine.
Understanding Pagination
Pagination involves dividing a large dataset into smaller, more manageable sections called pages. Users can navigate through these pages using navigation controls, such as next and previous buttons. This approach prevents long lists from cluttering the user interface, making it easier for users to find the information they need.
Note: For this Tutorial, we are going to use project which we created in our blog: Thymeleaf and Bootstrap 5 Template Engine in Spring Boot with Example
Setting Up the Project
Before diving into pagination implementation, let’s set up a Spring Boot project:
- Create a Spring Boot Project: Start by using Spring Initializr to create a new Spring Boot project with the necessary dependencies:
- Spring Web
- Thymeleaf
- Spring Data JPA
- Project Structure: Organize your project structure as per Spring Boot conventions. You can check it in our previous tutorial.
Implementing Pagination
We’ll guide you through the process of implementing pagination using Thymeleaf and Spring Boot:
- Create a JPA Entity: Set up a JPA entity representing the data you want to paginate, such as a
Productentity. - Repository Layer: Create a repository interface extending
JpaRepositoryand declare a method to retrieve paginated data. - Controller: Develop a controller that handles requests for paginated data. Fetch the data using the repository method and pass it to the Thymeleaf template.
- Thymeleaf Template: Design a Thymeleaf template to display the paginated data. Utilize Thymeleaf’s iteration capabilities to iterate through the dataset and display it dynamically. For Pagination UI, we are going to use Bootstrap 5
- Navigation Controls: Implement navigation controls within the Thymeleaf template, allowing users to switch between pages.
Pagination Example
For brevity, let’s outline the process using a simplified example:
- Product Entity:
   @Entity
   public class Product {
       @Id
       @GeneratedValue(strategy = GenerationType.IDENTITY)
       private Long id;
       private String name;
       private double price;
       // getters and setters
}- Repository:
   public interface ProductRepository extends JpaRepository<Product, Long> {
}- Controller:
   @Controller
   public class ProductController {
       @Autowired
       private ProductRepository productRepository;

       @GetMapping("/products")
       public String getProductsPage(Model model, @RequestParam(defaultValue = "0") int page) {
           Page<Product> products = productRepository.findAll(PageRequest.of(page, 10));
           model.addAttribute("products", products);
           model.addAttribute("currentPage", page);
           return "products";
       }
}- Thymeleaf Template (
products.html):
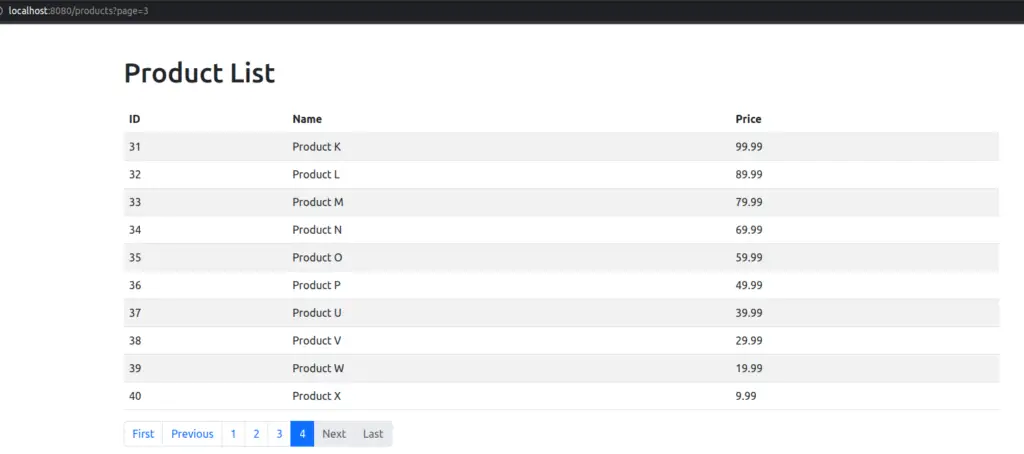
Below is a minimal and visually appealing UI using Bootstrap 5 for theproducts.htmltemplate. You can use this template as a starting point and further customize it according to your preferences.
<!DOCTYPE html>
<html xmlns:th="http://www.thymeleaf.org">
<head>
    <title>Product List</title>
    <!-- Bootstrap CSS -->
    <link rel="stylesheet" href="https://cdn.jsdelivr.net/npm/[email protected]/dist/css/bootstrap.min.css">
</head>
<body>
    <div class="container mt-5">
        <h1 class="mb-4">Product List</h1>
        <table class="table table-striped">
            <thead>
                <tr>
                    <th>ID</th>
                    <th>Name</th>
                    <th>Price</th>
                </tr>
            </thead>
            <tbody>
                <tr th:each="product : ${products.content}">
                    <td th:text="${product.id}"></td>
                    <td th:text="${product.name}"></td>
                    <td th:text="${product.price}"></td>
                </tr>
            </tbody>
        </table>

        <nav aria-label="Page navigation">
            <ul class="pagination">
                <li class="page-item" th:classappend="${currentPage == 0 ? 'disabled' : ''}">
                    <a class="page-link" th:href="@{/products(page=0)}">First</a>
                </li>
                <li class="page-item" th:classappend="${currentPage == 0 ? 'disabled' : ''}">
                    <a class="page-link" th:href="@{/products(page=${currentPage - 1})}">Previous</a>
                </li>
                <li class="page-item" th:each="i : ${#numbers.sequence(0, products.totalPages - 1)}"
                    th:classappend="${currentPage == i ? 'active' : ''}">
                    <a class="page-link" th:href="@{/products(page=${i})}" th:text="${i + 1}"></a>
                </li>
                <li class="page-item" th:classappend="${currentPage == products.totalPages - 1 ? 'disabled' : ''}">
                    <a class="page-link" th:href="@{/products(page=${currentPage + 1})}">Next</a>
                </li>
                <li class="page-item" th:classappend="${currentPage == products.totalPages - 1 ? 'disabled' : ''}">
                    <a class="page-link" th:href="@{/products(page=${products.totalPages - 1})}">Last</a>
                </li>
            </ul>
        </nav>
    </div>

    <!-- Bootstrap JS -->
    <script src="https://cdn.jsdelivr.net/npm/[email protected]/dist/js/bootstrap.bundle.min.js"></script>
</body>
</html>
Data Loading in Database (Optional)
For this tutorial, we have used Data SQL Scripts to Provide Initial Default Data for Models in Spring Boot. Also in github project,we have provided it in src/main/resources.You might already having data in your model, or you can do it manually by inserting data using command line. We have used Postgres database for this example project. This can be used for MySQL as well. You can read our blog for integrating databases.
- Connect PostgreSQL in Spring Boot: Maven & Gradle Configuration
- How to Connect MySQL Database in a Spring Boot Project
Running the Application
- Build and run the Spring Boot application.
- Access
http://localhost:8080/productsin your web browser to view the paginated product list.
Conclusion
Pagination is a crucial technique for enhancing user experience and improving the performance of web applications displaying large datasets. By integrating pagination with Spring Boot and Thymeleaf, you can create user-friendly interfaces that efficiently present data without overwhelming the users. This tutorial has provided you with the foundations of implementing pagination in your Spring Boot projects, enabling you to build applications that deliver a seamless and organized browsing experience.
Find this project on Github.
Blogs You Might Like to Read!
- Find More Tutorials on Spring Boot.
- Using Fragments in Thymeleaf: A Guide to Reusable HTML Templates