
Bringing your web app project to the global stage often requires hosting it online. Ngrok offers an incredibly convenient way to expose your local development environment to the internet securely. In this blog post, we’ll delve into the process of hosting your web app project using Ngrok, allowing you to share your work with anyone, anywhere.
What is NgRok?
Ngrok is a free service that creates a secure connection between a port on your local machine and the internet. It generates a dynamic URL that gives temporary public access to your local app. While it’s handy for testing and showcasing, be cautious: it bypasses firewalls and exposes your app. The URL’s lifetime is short (default 8 hours) and can be cut shorter by closing the Ngrok terminal. It’s a balance between convenience and security, so use it wisely.
How to use NGROK for Web Application Deployment
Step 1: Sign Up and Download Ngrok
- (Optional) Visit the Ngrok website (www.ngrok.com) and create an account.
- Download (https://ngrok.com/download) the Ngrok executable for your operating system.
Step 2: Set Up and Run Your Web App Project
Ensure your web app is running smoothly in your local development environment. Confirm that your app’s port configuration is correct (default is often 8000).
- Django Project Runs on 8000 Port
- Spring Boot Project Runs on 8080 Port
- ReactJs Project Mostly runs on 5000 Port
- Flask runs on 5000 Port
This method will work for any project. Just the thing that, your project should be running on which PORT NUMBER.
Step 3: Running Ngrok
- Open a terminal window and navigate to the directory where the Ngrok executable is located.
- Run the following command to expose your local server:
ngrok http 8000Replace 8000 with your app’s port number if it’s different.
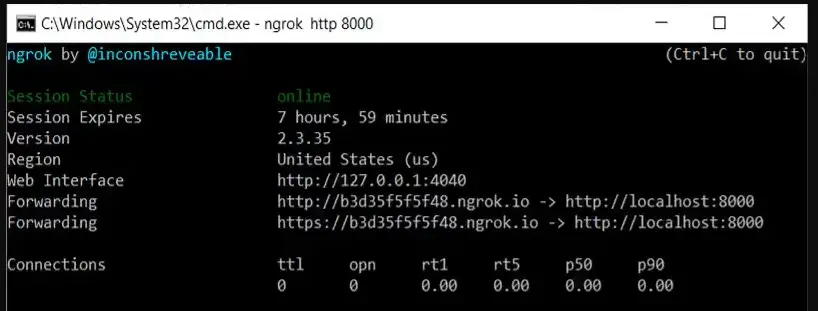
Step 4: Accessing the Exposed URL
- As soon as you run the Ngrok command, you’ll receive a public URL in the terminal.
- This URL can be used to access your web app from anywhere.
Step 5: Custom Subdomains (Optional)
- Ngrok provides the option to create custom subdomains for your project.
- To use a custom subdomain, sign in to your Ngrok account and follow the instructions provided on the dashboard.
Step 6: HTTPS Access (Optional)
- Ngrok supports secure HTTPS connections to your local server.
- Access your app using the HTTPS URL provided by Ngrok for enhanced security.
Step 7: Sharing Your Web App
- Share the Ngrok-provided URL with anyone you want to showcase your app to.
- Your web app, hosted through Ngrok, will be accessible to them with just a click.
Step 8: Managing Your Ngrok Session
- Keep the terminal window running to maintain the connection. If you close it, the connection will be terminated.
Step 9: Securing Your Ngrok Environment
- Be cautious when sharing the Ngrok URL, as anyone with the link can access your app.
- Ngrok provides token-based authentication for added security.
Conclusion
Ngrok offers a quick and straightforward solution for hosting your web app project during development, regardless of whether it’s a Django, Flask, or Spring Boot application. This guide has shown you how to get started with Ngrok, making it a valuable tool for web developers seeking to make their local projects accessible to a wider audience. Now, you can easily showcase your work and collaborate with others without the hassle of traditional hosting setups.