
In the fast-paced world of web development, having a reliable and cost-effective platform to host your projects is essential. PythonAnywhere offers a fantastic opportunity for developers to host and deploy Django-powered websites for free, making it an excellent choice for those looking to showcase their projects without breaking the bank. In this step-by-step guide, we’ll walk you through the process of hosting your Django Python website on PythonAnywhere.
Hosting Django Project on PythonAnywhere
Step 1: Sign Up and Create an Account for Free Hosting
Go to the PythonAnywhere website (www.pythonanywhere.com) and sign up for a free account.Once registered, log in to your account.
Step 2: Accessing the Dashboard
After logging in, you’ll be directed to your dashboard. Click on the “Consoles” tab.
Step 3: Setting Up a Virtual Environment
In the “Consoles” tab, click on the “Bash” button to open a Bash console. Create a virtual environment by running the following command:
mkvirtualenv --python=/usr/bin/python3.8 myenvReplace “myenv” with your desired environment name. You can use also replace python version as per your requirement.
Step 4: Cloning Your Django Project
In the Bash console, navigate to the directory where you want to clone your Django project. Clone your project’s repository using Git:
git clone <your_repository_url>For example:
git clone https://github.com/studygyaan/Django-CRM-Project.gitNavigate into your project directory:
cd <your_project_directory>Step 5: Installing Dependencies and Configuring Settings
- Install project dependencies using pip:
pip install -r requirements.txt- Open your Django project’s settings file and make necessary changes, such as updating the
ALLOWED_HOSTSand configuring the database settings to match the PythonAnywhere environment.
Step 6: Creating Static Files
In your Bash console, run the following commands to collect your static files:
python manage.py collectstaticThis will create a static folder in your project.
Step 7: Configuring Web App on PythonAnywhere
- Navigate back to your PythonAnywhere dashboard.
- Click on the “Web” tab and then the “Add a new web app” button.
- Choose the manual configuration option, click your project python version.
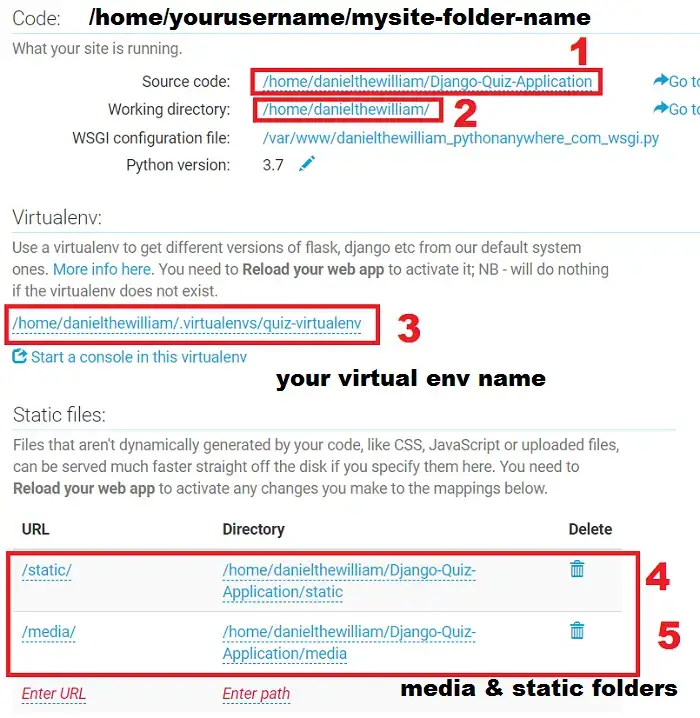
- Under Code Section. Specify the source code directory as the path to your Django project something like
/home/username/my_project(replace “my_project” with your project’s name). - Configure the virtual environment path (something like
/home/username/.virtualenvs/myenv).
Step 8: Edit WSGI File to Point our Django Project to Server.
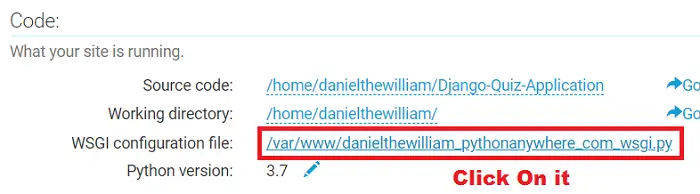
Click on the WSGI configuration file link. It will take you to your Hosted Django Project WSGI File. We need to add the following code. Just remove everything inside that file and paste the bellow code in it. Note you need to change bold code with your relevant paths.
import os
import sys

# assuming your Django settings file is at
# '/home/myusername/mysite/mysite/settings.py'
path = '/home/username/mysite'
if path not in sys.path:
     sys.path.insert(0, path)

os.environ['DJANGO_SETTINGS_MODULE'] = 'mysite.settings'

from django.core.wsgi import get_wsgi_application
application = get_wsgi_application()
Save the file.
Step 9: Configuring Static and Media Files
- In the “Static files” section of your web app configuration, add a new mapping:
- URL:
/static/ - Directory:
/home/username/path_to_your_project/static/
- For media files, add another mapping:
- URL:
/media/ - Directory:
/home/username/path_to_your_project/media/
Step 10: Saving and Reloading the Web App
- Click the “Next” button, review your settings, and then click “Save”.
- After saving, click the “Reload” button to apply the changes to your web app.
Step 11: Accessing Your Deployed Django Website
- Once the web app is reloaded, you’ll find the URL of your deployed website at the top of the “Web” tab in your PythonAnywhere dashboard.
- Click on the link to open your website in a new tab and ensure that everything is working as expected.
Miscellaneous
- If you want to update your code, go to bash and inside your project, run git pull command
- If you get allowed host error, then probably you need to update ALLOWED_HOSTS in settings.py file
- Whenever you update code, do changes, always reload your project from Web tab.
Conclusion
Congratulations! You’ve successfully deployed your Django Python website for free on PythonAnywhere. This step-by-step guide has walked you through each stage, from signing up to accessing your live website. Now you can share your projects with the world without worrying about hosting costs. PythonAnywhere’s ease of use and compatibility with Django make it an ideal choice for developers looking for a hassle-free hosting solution.