
Machine Learning has revolutionized the way we approach complex problems across various domains. Deploying Machine Learning models in real-world applications can unlock powerful insights and drive informed decision-making. In this blog, we’ll explore a comprehensive guide on how to deploy a Machine Learning model using Django, a versatile Python web framework. Whether it’s predicting sales, classifying data, or recommending products, this step-by-step process will help you serve your ML models through web applications, making them accessible and valuable to a broader audience. Let’s dive in and harness the full potential of Machine Learning deployment with Django!
Prerequisites:
Before we proceed, ensure you have the following prerequisites:
- Basic knowledge of Django and Python.
- A trained ML model in the form of Pickle File.
Note: To create pickle file (model.pkl) of your model, please read our blog – How to Create & Run Pickle File for Machine Learning Model
In this tutorial, we are using our ML model which we created in our blog on House Price Prediction using Linear Regression Machine Learning.
How to Integrate ML Model into Website using Django
Step 1: Create a Django Project
If you haven’t installed Django yet, open your terminal or command prompt and execute:
pip install djangoNext, create a new Django project with the following command:
django-admin startproject myprojectStep 2: Create a Django App
Django projects are made up of apps that group related functionalities. Create a new app for our project:
cd myproject
python manage.py startapp pricemodel
Step 3: Prepare the Model
Move the “linear_regression_model.pkl” file to a new directory named “models” within the “pricemodel” app. The directory structure will be:
myproject/
    ├── pricemodel/
    │   ├── models/
    │   │   └── linear_regression_model.pkl
    │   ├── templates/
    │   │   └── index.html
    │   ├── ...
    │   └── views.py
    ├── myproject/
    ├── manage.py
    └── ...
Step 4: Modify Django Settings
In the “myproject/settings.py” file, add the “pricemodel” app to the “INSTALLED_APPS” list. Also, configure the TEMPLATES setting to include the ‘templates/’ directory for Django to find our custom templates:
INSTALLED_APPS = [
    # ...
    'pricemodel',
    # ...
]

TEMPLATES = [
    {
        'BACKEND': 'django.template.backends.django.DjangoTemplates',
        'DIRS': [BASE_DIR, 'templates/'],
        'APP_DIRS': True,
        'OPTIONS': {
            # ... (Other options)
        },
    },
]
Step 5: Create a View and Form
In the “pricemodel/views.py” file, create a function that will handle incoming requests and serve predictions using the linear regression model. Additionally, create a form to take input data from users:
import os
import joblib
import numpy as np
from django.shortcuts import render
from .forms import PricePredictionForm

def predict_price(request):
    if request.method == 'POST':
        form = PricePredictionForm(request.POST)
        if form.is_valid():
            # Load the trained linear regression model
            model_path = os.path.join(os.path.dirname(__file__), 'models', 'linear_regression_model.pkl')
            model = joblib.load(model_path)

            # Extract input data from the form
            new_data = np.array(list(form.cleaned_data.values())).reshape(1, -1)

            # Perform prediction
            predicted_price = model.predict(new_data)[0]

            # Prepare the response
            context = {
                'form': form,
                'predicted_price': round(predicted_price, 2),
            }
            return render(request, 'index.html', context)
    else:
        form = PricePredictionForm()

    context = {'form': form}
    return render(request, 'index.html', context)
Create a new file named “forms.py” within the “pricemodel” app to define the PricePredictionForm:
from django import forms

class PricePredictionForm(forms.Form):
    bedrooms = forms.IntegerField(label='Bedrooms', min_value=0)
    bathrooms = forms.IntegerField(label='Bathrooms', min_value=0)
    sqft_living = forms.IntegerField(label='Sqft Living', min_value=0)
    sqft_lot = forms.IntegerField(label='Sqft Lot', min_value=0)
    floors = forms.DecimalField(label='Floors', min_value=0, decimal_places=1)
    waterfront = forms.BooleanField(label='Waterfront', required=False)
    view = forms.IntegerField(label='View', min_value=0)
    condition = forms.IntegerField(label='Condition', min_value=1, max_value=5)
Step 6: Create Templates
Within the “templates” directory, create “index.html” with the following content:
<!--  index.html  -->

<!DOCTYPE html>
<html>
<head>
    <title>Real Estate Price Prediction</title>
</head>
<body>
    <form method="post">
        {% csrf_token %}
        {{ form.as_p }}
        <button type="submit">Predict Price</button>
    </form>

    {% if predicted_price %}
    <div>
        <h2>Predicted Price: ${{ predicted_price }}</h2>
    </div>
    {% endif %}
</body>
</html>
Step 7: Create URL Patterns
In the “pricemodel/urls.py” file, define URL patterns to map the views to specific URLs:
from django.urls import path
from . import views

urlpatterns = [
    path('', views.predict_price, name='predict_price'),
]
Step 8: Add the App URLs to the Main URLs
In the “myproject/urls.py” file (the main URLs file), include the URLs from the “pricemodel” app:
from django.contrib import admin
from django.urls import path, include

urlpatterns = [
    path('admin/', admin.site.urls),
    path('', include('pricemodel.urls')),
]
Step 9: Test Locally
Test the web application locally by running the development server:
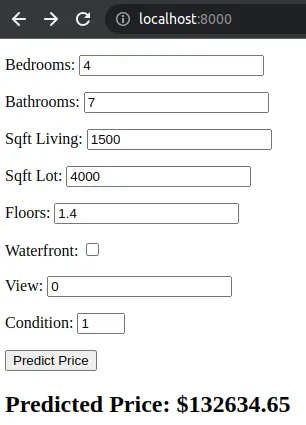
python manage.py runserverVisit http://localhost:8000 in your web browser, input the data in the form, and see the predicted price displayed under the form on the same page.
Step 10: Deploy the Application
Before deploying the application to a production server, ensure you have followed the necessary steps provided by your hosting provider. Services like Heroku or AWS Elastic Beanstalk are popular choices for Django applications.
Conclusion
Deploying Machine Learning models using Django opens up a world of possibilities, empowering us to leverage the full potential of artificial intelligence in real-world applications. Whether it’s predicting financial trends, diagnosing medical conditions, or enhancing user experiences, the step-by-step guide we’ve explored allows us to serve ML models through web applications effortlessly. By harnessing the power of Django’s versatility and ease of use, we can make our models accessible to a wider audience and drive data-driven decisions across diverse industries. Embrace the transfor mative capabilities of Machine Learning deployment with Django, and unlock new horizons of innovation and efficiency.
Find this tutorial on Github.