
Django, a versatile web framework, empowers developers to build web applications with ease. One of the foundational aspects of web development is performing CRUD operations: Create, Read, Update, and Delete. In this tutorial, we’ll walk through building a simple “Task List” application using Django, where users can manage their tasks effectively. We’ll cover each CRUD operation, providing a complete example with models, forms, views, templates, and URLs.
Understanding CRUD Operations in Django
CRUD stands for Create, Read, Update and Delete:
- Create: Creating data involves adding new records to a database. In Django, this is typically done using a ModelForm, which allows you to create forms based on your data models.
- Read: Reading data involves retrieving records from the database. In Django, you can use the
objectsattribute of a model to query the database and fetch data. - Update: Updating data involves modifying existing records in the database. Django provides an elegant way to update records using ModelForms.
- Delete: Deleting data involves removing records from the database. In Django, the
delete()method of a model instance is used to achieve
Project Setup
You can refer to our blog on How to Create Django Project. For this example, we are creating a project with name myproject and app name task.
Step 1: Basic Settings
Step 1.1: Create a Django Project: Create a new Django project by running:
django-admin startproject myprojectStep 1.2: Navigate to Project Directory: Move into the project directory:
cd myproject
Step 1.3: Create a Django App: Create a new app within the project. Let’s call it “task”:
django-admin startapp taskStep 1.4: Configure Settings: Open myproject/settings.py and add 'task' to the INSTALLED_APPS list.
Step 1.5: Create Templates Folder and base.html: Create the template folder in your app. For example task/templates. Now inside templates create a html file base.html and add following:
<!DOCTYPE html>
<html lang="en">
<head>
    <meta charset="UTF-8">
    <meta name="viewport" content="width=device-width, initial-scale=1.0">
    <title>{% block title %}Task List App{% endblock %}</title>
</head>
<body>
    <header>
        <h1>Task List App</h1>
    </header>
    <nav>
        <a href="{% url 'task_list' %}">Task List</a>
        <a href="{% url 'create_task' %}">Create Task</a>
    </nav>
    <div class="container">
        {% block content %}
        {% endblock %}
    </div>
</body>
</html>
We will be using this base.html to inherit in our html files. For styling you can refer to our github project, link at bottom.
Step 1.6: Create urls.py in app: Create the urls.py file in your app. and include it in main projects urls.py file.
# myproject/urls.py

from django.contrib import admin
from django.urls import path, include

urlpatterns = [
    path('admin/', admin.site.urls),
    path('', include('task.urls')),
]
Step 2: Creating the Task Model
Let’s start by defining the Task model that represents our tasks. Add following in task/models.py:
# models.py

from django.db import models

class Task(models.Model):
    title = models.CharField(max_length=200)
    description = models.TextField()
    created_at = models.DateTimeField(auto_now_add=True)
    completed = models.BooleanField(default=False)

    def __str__(self):
        return self.title
Step 3: Designing the Task Form
We’ll create a form using Django’s ModelForm to enable users to add and edit tasks easily. Create a file forms.py in task app and add following:
# forms.py

from django import forms
from .models import Task

class TaskForm(forms.ModelForm):
    class Meta:
        model = Task
        fields = ['title', 'description', 'completed']
Once you create your model, make migrations for your project.
python manage.py makemigrations
python manage.py migrate
Implement CRUD Operations for Task List App
Let’s consider a simple scenario of creating and managing a “Task List” application. We’ll cover the complete implementation including views, forms, models, templates, and URLs.
Note: For this project, we are using sqlite database. But this blog can be used exactly same with other database, just you need to configure your database settings, which you can learn with our bellow blogs:
1. Reading and Listing Tasks Operation:
We’ll begin by displaying a list of tasks that users have entered.
# task/views.py

from django.shortcuts import render
from .models import Task

def task_list(request):
    tasks = Task.objects.all()
    return render(request, 'task_list.html', {'tasks': tasks})
<!-- templates/task_list.html -->
{% extends 'base.html' %}
{% block content %}
<h2>Task List</h2>
<ul>
{% for task in tasks %}
<li>{{ task.title }} - {{ task.description }}</li>
{% endfor %}
</ul>
{% endblock %}2. Creating New Tasks Operation:
Next, we’ll enable users to create new tasks.
# task/views.py

from django.shortcuts import render, redirect
from .forms import TaskForm

def create_task(request):
    if request.method == 'POST':
        form = TaskForm(request.POST)
        if form.is_valid():
            form.save()
            return redirect('task_list')
    else:
        form = TaskForm()
    return render(request, 'create_task.html', {'form': form})
<!-- templates/create_task.html -->
{% extends 'base.html' %}
{% block content %}
<h2>Create New Task</h2>
<form method="post">
{% csrf_token %}
{{ form.as_p }}
<button type="submit">Create</button>
</form>
<a href="{% url 'task_list' %}">Back to Task List</a>
{% endblock %}3. Updating Tasks Operation:
Users should be able to edit existing tasks.
# task/views.py

def edit_task(request, pk):
    task = Task.objects.get(pk=pk)
    if request.method == 'POST':
        form = TaskForm(request.POST, instance=task)
        if form.is_valid():
            form.save()
            return redirect('task_list')
    else:
        form = TaskForm(instance=task)
    return render(request, 'edit_task.html', {'form': form, 'task': task})
<!-- teamplates/edit_task.html -->
{% extends 'base.html' %}
{% block content %}
<h2>Edit Task</h2>
<form method="post">
{% csrf_token %}
{{ form.as_p }}
<button type="submit">Update</button>
</form>
<a href="{% url 'task_list' %}">Back to Task List</a>
{% endblock %}4. Deleting Tasks:
Lastly, we’ll allow users to delete tasks.
# task/views.py

def delete_task(request, pk):
    task = Task.objects.get(pk=pk)
    if request.method == 'POST':
        task.delete()
        return redirect('task_list')
    return render(request, 'delete_task.html', {'task': task})
<!-- templates/delete_task.html -->
{% extends 'base.html' %}
{% block content %}
<h2>Delete Task</h2>
<p>Are you sure you want to delete "{{ task.title }}"?</p>
<form method="post">
{% csrf_token %}
<button type="submit">Delete</button>
</form>
<a href="{% url 'task_list' %}">Back to Task List</a>
{% endblock %}Connecting Everything with URLs:
In your app urls.py file, add the following urls for connect all view which we have implement in CRUD Operations:
# task/urls.py
from django.urls import path
from . import views

urlpatterns = [
    path('', views.task_list, name='task_list'),
    path('create/', views.create_task, name='create_task'),
    path('edit/<int:pk>/', views.edit_task, name='edit_task'),
    path('delete/<int:pk>/', views.delete_task, name='delete_task'),
]
Run the Server and Test
With all the pieces in place, run your Django developmeent server.
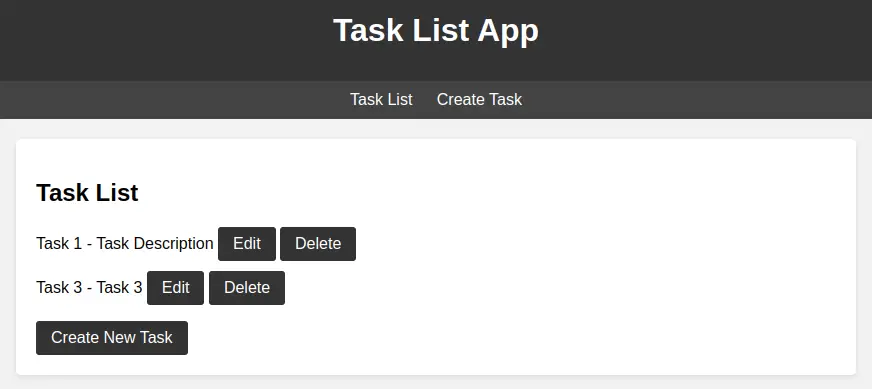
python manage.py runserverNavigate to the URL http://localhost:8000/ and perform your CRUD operations.
Conclusion:
In this tutorial, we’ve built a “Task List” application using Django, covering all four CRUD operations. By implementing models, forms, views, templates, and URLs, we’ve demonstrated a simple yet complete example of how to create, read, update, and delete tasks. This foundational understanding equips you with the knowledge to expand and enhance your Django projects.
Find this tutorial on Github.