
In our increasingly interconnected world, language barriers can be a significant obstacle. Fortunately, technology can help bridge these gaps. In this blog post, we will guide you through the process of creating a Language Translator App using Django and the translate Python library. With this app, users can easily translate text between different languages, making communication more accessible and efficient.
Prerequisites
Before we dive into building our Language Translator App, ensure you have the following prerequisites:
- Django Installed: Make sure you have Django installed in your Python environment. You can install it using pip:
pip install DjangotranslateLibrary: Install thetranslatelibrary, which will allow us to perform language translations using api. You can install it with:
pip install translate- Basic Understanding of Django: Familiarize yourself with Django’s project structure, views, templates, and models.
- HTML/CSS Knowledge: Basic HTML and CSS knowledge will be helpful for creating user interfaces.
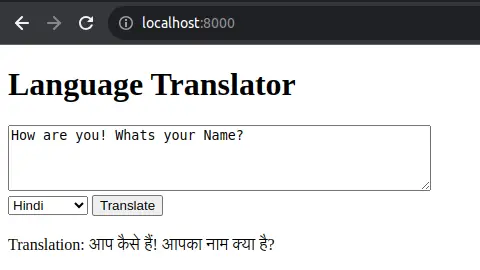
Language Translator App using Django and Python
Let’s start building our Language Translator App step by step:
Step 1: Create a Django Project and App
Begin by creating a new Django project and an app within the project. You can do this using the following commands:
django-admin startproject translator_project
cd translator_project
python manage.py startapp translator_app
Step 2: Configure the Project Settings
In your project’s settings (settings.py), add the translator_app to the INSTALLED_APPS list:
INSTALLED_APPS = [
    # ...
    'translator_app',
    # ...
]
Step 3: Define Models
In this simple app, we won’t need models, so you can skip this step.
Step 4: Create Views
Define the views in your translator_app/views.py file. Create a view to render the translation form and another to handle the translation process.
# translator_app/views.py

from django.shortcuts import render
from django.http import JsonResponse
from translate import Translator

def translator_home(request):
    return render(request, 'translator_app/home.html')

def translate_text(request):
    if request.method == 'POST':
        text = request.POST.get('text', '')
        target_language = request.POST.get('target_language', 'en')

        translator = Translator(to_lang=target_language)
        translation = translator.translate(text)

        response_data = {'translation': translation}
        return JsonResponse(response_data)
    return JsonResponse({'error': 'Invalid request'})
Step 5: Create Templates
Create HTML templates for your app. You can start with a simple form for text input and display the translation result.
<!-- translator_app/templates/translator_app/home.html -->
<!DOCTYPE html>
<html lang="en">
<head>
    <meta charset="UTF-8">
    <title>Language Translator</title>
</head>
<body>
    <h1>Language Translator</h1>
    <form id="translation-form">
        <textarea name="text" rows="4" cols="50"></textarea>
        <select name="target_language">
            <option value="en">English</option>
            <option value="es">Spanish</option>
            <option value="fr">French</option>
            <!-- Add more language options as needed -->
        </select>
        <button type="submit">Translate</button>
    </form>
    <div id="translation-result"></div>
    <script src="https://code.jquery.com/jquery-3.6.0.min.js"></script>
    <script>
        $(document).ready(function () {
            $('#translation-form').submit(function (e) {
                e.preventDefault();
                const formData = $(this).serialize();
                $.ajax({
                    type: 'POST',
                    url: '/translate_text/',
                    data: formData,
                    success: function (data) {
                        $('#translation-result').text('Translation: ' + data.translation);
                    },
                    error: function () {
                        $('#translation-result').text('Translation error.');
                    }
                });
            });
        });
    </script>
</body>
</html>
Step 6: Define URLs
Configure your app’s URLs in translator_app/urls.py:
# translator_app/urls.py
from django.urls import path
from . import views

urlpatterns = [
    path('', views.translator_home, name='translator_home'),
    path('translate_text/', views.translate_text, name='translate_text'),
]
Step 7: Configure Main URLs
Include your app’s URLs in the project’s main urls.py:
# translator_project/urls.py
from django.contrib import admin
from django.urls import include, path

urlpatterns = [
    path('admin/', admin.site.urls),
    path('', include('translator_app.urls')),
]
Step 8: Run the Development Server
Now, you can run the development server:
python manage.py runserverAccess the app in your web browser at http://127.0.0.1:8000/ and start translating text between languages.
Conclusion
In this blog post, we’ve shown you how to create a Launguage Translator App using Django and the translate library. This app allows users to easily translate text between different languages. You can further enhance this app by adding more language options, improving the user interface, and handling error cases. Building a language translator app like this can be a valuable addition to your portfolio and a useful tool for language enthusiasts and travelers.
Find this project on Github.
Blogs You Might Like to Read!
- Django Project: Text to HTML and HTML to Text Generator/Converter
- Create Django News Website using Python News Api
- How to Generate QR Code in Python Django
- Build a Weather App in Python Django: Guide with Example
- Django Bootstrap – Integrate Template Example
- Best Folder and Directory Structure for a Django Project
- Django Rest Framework Tutorials